About this tutorial
This tutorial will focus on the conception and creation of an Artificial Intelligence. While the implementation is aimed for Unity, the whole theory can be applied for any other game.
All concepts discussed here have been learnt by our team during the prototyping stage of Radiant Blade and has reached a production-ready state.
Why an artificial intelligence?
Before diving into the technicalities, it can be good to take a step back and to wonder why we actually want an A.I. for our game.
For a long time, I imagined making the most astonishing A.I. for a game, the kind of A.I. that would awe the player. You know, this kind of A.I. that would anticipate your every move and would be impossible to beat? Well, tell you what, this kind of A.I. is just no fun to play against.
A worthy game is a game that you can play with and that deliver entertainment. So our A.I. has to be playable with. It has to be a companion, something the player can interact with in a valuable manner.
Now, obviously, a game that is only fun won’t be an amazing game. A game will also need to be cool, or meaningful, or artistic. But for our A.I., we want entertainment, so let’s narrow this concept further.
Game Design
So, what is entertainment? And more specifically, what is entertainment in a game?
The team has spent some time thinking about it, and our conclusion can be summarized by a single word: learning. An entertaining game is a game where the player gets to learn concepts and gets to exploit them.
Entertainment is born from that little spark of curiosity that bugs your mind once you notice something new, and it growths over and over until you fully understand the novelty.
Otherwise said, an entertaining A.I. must be learnable. Simple as that.
From this small idea suddenly emerges a wide understanding of all A.I. in all video games, from Mario to DOOM, from World of Warcraft to Binding of Isaacs.
If you analyse them, you’ll find out that they are all predictable. Not necessarily deterministic as some randomness may be involved, but predictable nonetheless.
And from that, a new question quickly arises. How do you create a predictable A.I.?
Short answer: with state machines.
State machines
A state machine is a mathematical tool that contains states and transitions.
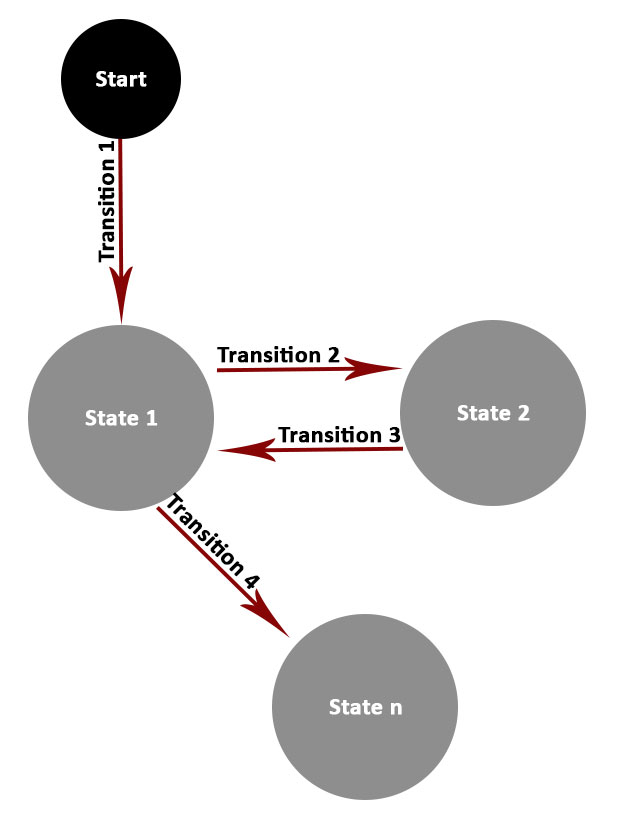
Within a deterministic state machine, you are at one specific state, and when comes the time to move, you follow one of the possible transitions to then arrive into a new state. Transitions may be subject to conditions, with a state being reachable only if, say, you have a specific spell available.
The good thing about state machines is that they are both expressive and predictable. Say that your states are concepts such as “attack”, “be hit”, “run to target” and “flee”, you could create a state machine that modelizes the basic behaviour of an A.I with a few transitions:
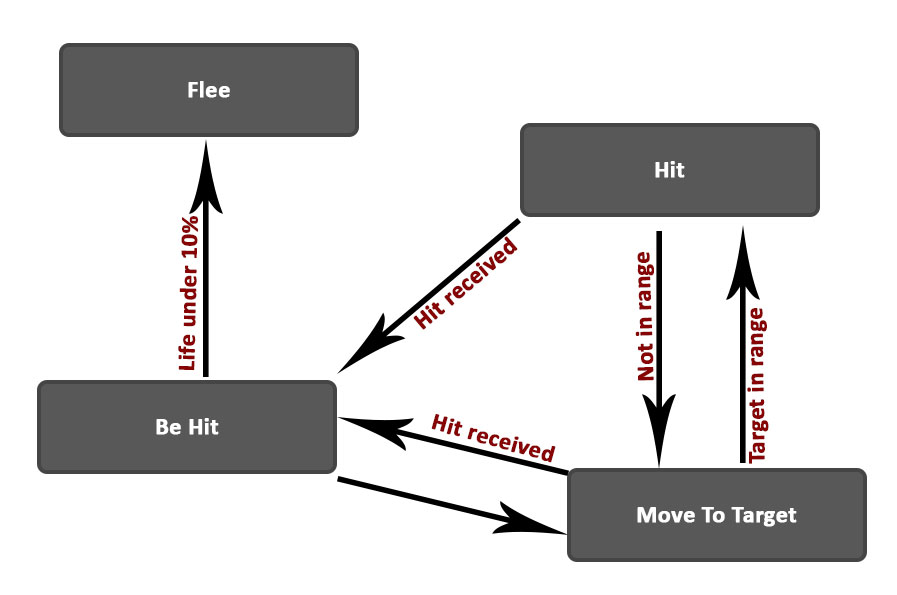
Notice that the A.I. we just crafted can be described with a few sentences:
- The A.I. flees if it has under 10% of life;
- The A.I. can be hit;
- The A.I. runs toward the player and hit him/her when in range.
It’s a good thing, it means that the A.I. is simple. Simple is good. If at some point you start to fail describing your A.I. simply, it probably is a hint that you need to take a step back.
States machines and Unity
Alright, so state machines are cool. Can we have state machines within Unity?
Short answer: yes.
There are three broad approaches for this:
- Do it yourself;
- Use the Animator;
- Get an asset from the Unity store.
Since state machines are a very well known tools for video games, I would not recommend doing it yourself. It has already been done over and over, and except if you want to learn how to code one, you can just get something already working.
An alternative is to use the the built-in Animator of Unity. While the name may be confusing, it’s actually a state machine that happens to play animations. But guess what? You are not forced to have animations in the Animator, and if you don’t, it behaves exactly as a state machine would.
So, it’s both really fast and ergonomic to use. We approve.
The last possibility is to get an asset from the Unity Store. We personally didn’t try, and didn’t feel the need to, but we are convinced that there should be many assets that would do just as good as Unity’s Animator.
If you personally use one that has notable advantages over the Animator, don’t hesitate and tell us about it!
The Animator
You may already have been using the Animator for standard animation within Unity, but here we are going to rework the different concepts for our purpose.
Let’s go through it.
The states
Usually, the states of the Animator contain an animation. It won’t be our case, it will instead be linked to a piece of code describing a behaviour.
To illustrate it, let’s take a look at the Game Object defining our archer:
The children of “Behaviours” are A.I. behaviours. Basically, they are small controllers that will take ownership of the Archer when their corresponding state is active.
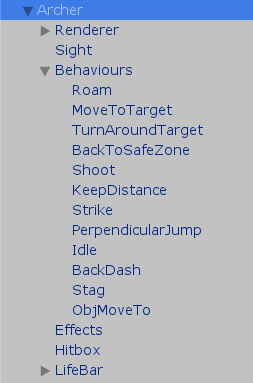
When the “Shoot” state is active, so is the “Shoot Behaviour” script for our Archer.
Don’t forget that this is state-driven. It’s the “Shoot Behaviour” that notifies the Animator when it is finished. The built-in blue progression bar of the Animator can be confusing, but it’s really only visual.
The variables
An A.I. is a responsive system. Something that adapts. But adapts to what? Well, to the player and to the environment of course!
The Animator variables will be used to describe our game’s state and will be used to make informed decisions.
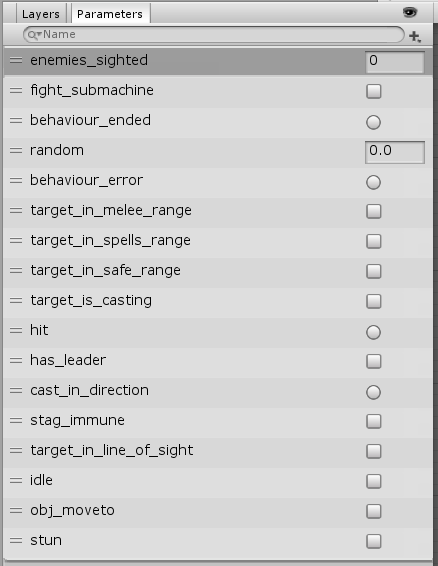
Now, an important conception point. When using the Animator in a traditional way, most of the state transitions are done because the associated animation ends. For an A.I., a state is a behaviour, it holds game-logic for a non-defined duration.
To compensate, we are using two variables whose purpose is to notify the end of a state: “behaviour_ended” and “behaviour_error”. It’s basically an output from the states that says if they ended with success or in error.
The transitions
The transitions define the change of behaviour for our A.I: “Once I’m done walking to the target, what do I do?”
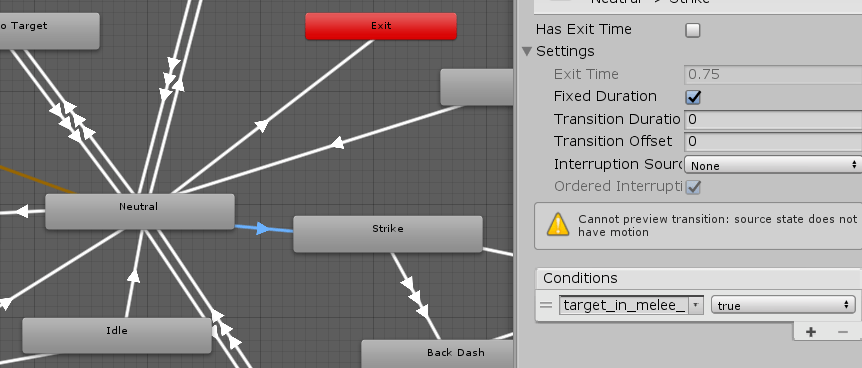
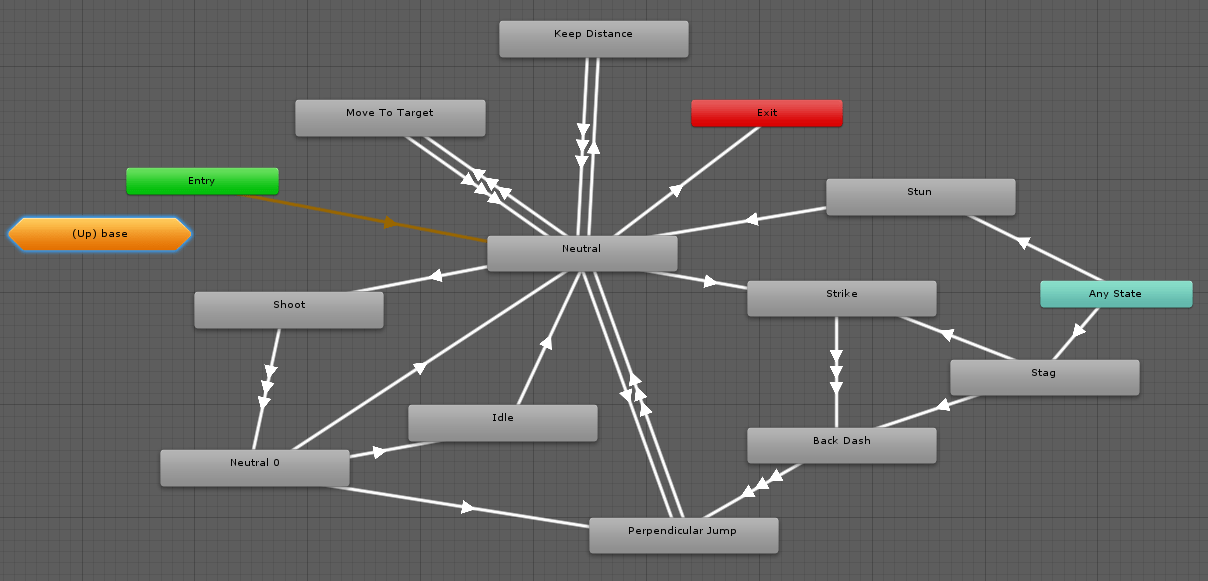
One thing you may not know about Unity’s Animator: the transitions are ordered. One specific transition will be evaluated first, and only if its associated condition is false will the second transition be evaluated.
This small feature is wonderful, because it allows us to design the A.I. as a central brain that make an educated choice based on prioritized possibilities.
Remember the Archer A.I. that we showed some chapters ago? Notice how orderly and centric it looks? Well, the “Neutral” node that you see is what we call a decision hub, here is the story that this hub describes:
- If there is no player, I stop fighting;
- Else if the player is far away, I go closer to be in range to shoot;
- Else if the player is not in my line of sight, I go closer to be able to shoot;
- Else if I’m in melee range, I strike;
- Else if the player is too close, I may choose to back away a little;
- Else I may randomly choose to turn around the player;
- Else I shoot at the player.
The wonderful thing is that each individual transition is extremely simple: it sums up to a single test, or even not at all. This is possible because all the information is carried by the fact that the previous transitions were necessarily false!
Implementation
From this point forward, you should have a good grasp of what we are doing. Notice how I still haven’t given a single line of code?
That’s a very good thing, because it means that our framework is high-level enough to be fully explained without any technicality. Once the coding part is done, designing an A.I. feels very plug-and-play.
What do we need?
Here are the tasks at hand to get our A.I. working:
- Coding A.I. behaviours;
- Linking our Animator with our available behaviours;
- Keeping a list of game related variables up-to-date for our Animator.
Behaviours
Before jumping in, let’s recap what a behaviour does.
- It works with the character controller of our game;
- It can be identified;
- It can be enabled;
- It can end on success;
- It can end on error;
- It can be interrupted;
- … And, that’s it.
Now that we know what we actually want, let’s write it down as an API:
public abstract class AbstractAIBehaviour : MonoBehaviour {

    // The character controlled by the behaviour.
    [SerializeField]
    protected CharController charController;

    // Must return the short hash value of the Animator state corresponding to this behaviour.
    abstract public int GetBehaviourHash();

    // Event to be called when the behaviour ends successfully.
    public event Action OnBehaviourEnded;

    // Event to be called when the behaviour fails.
    public event Action OnBehaviourError;

    // OnEnable()
    // OnDisable()
    // enable = true/false;
}
For the enabling and disabling part, we simply take advantage of Unity built-in methods, no need to reinvent the wheel.
That leaves us with a simple and concise API. Neat.
For the identifier, I created a method with a peculiar name: “GetBehaviourHash”. This is because of the way the Animator states are identified: the identifier of a state is the hash of its name.
https://docs.unity3d.com/ScriptReference/Animator.StringToHash.html
So for the state “Shoot”, the corresponding identifier is “Animator.StringToHash(“Shoot”)”.
In order to clarify things and to avoid computing the same hash again and again, we can simply store them as static variables somewhere:
/**
 * This class is a placeholder for pre-computed hashes.
 *
 * The purpose is to create a link between an Animator state's name and an AI behaviour.
 * The defined integers below should be used for the GetBehaviourHash of the classes inheriting AbstractAIBehaviour.
 */
public class BehaviourHashes {

    // Behaviour used so the character moves to an objective.
    static public readonly int OBJ_MOVETO_STATE = Animator.StringToHash("Obj MoveTo");

    // Behaviour used so the character does nothing at all.
    static public readonly int IDLE_STATE = Animator.StringToHash("Idle");

    // When the character is moving around without purpose
    static public readonly int ROAM_STATE = Animator.StringToHash("Roam");

    // ...
}
With this in mind, an implementation of our AbstractAIBehaviour would have something in the like in it:
    // Must return the short hash value of the Animator state corresponding to this behaviour.
    public override int GetBehaviourHash()
    {
        // State name in the Animator is “Idle”
        return BehaviourHashes.IDLE_STATE;
    }
We may store each hash in its own corresponding script, so “ROAM_STATE” could be stored in the “RoamBehaviour” class.
The only problem is, since we are implicitly linking each behaviour to a name, it can be bothersome to open every behaviour classes to gather the authorized names for the Animator states.
From this point forward, it’s all about writing the actual code for real behaviours, but this part is up to you, since you’re doing it for your game. All you need to do is implement subclasses of AbstractAIBehaviour 🙂
Linking the Behaviours with the Animator
We have A.I. behaviours that can be identified, listened at and enabled/disabled. Let’s make use of it.
We are going to start with a controller. Since we have several entities that are independent from each other, we need to synchronize them to get things working smoothly.
This controller purpose is to make sure that only one behaviour is enabled at a time, and to provide an entry-point to change the current behaviour.
As an aside, I know that some developers struggle to know when they should throw-in a new controller class in their game. It’s generally a good habit to think of controllers as code used to synchronize multiple smaller concepts.
/**
 * The AIBehaviourController is meant to link the A.I. Animator with the corresponding Behaviours.
 */
public class AIBehaviourController

    /**
     * Contains the available Behaviours.
     *
     * The key of a Behaviour is the value returned by its GetBehaviourHash method.
     */
    protected Dictionary<int, AbstractAIBehaviour> behaviours = new Dictionary<int, AbstractAIBehaviour>();

    // The A.I. Animator
    private Animator stateMachine;

    // The Behaviour being currently executed.
    private AbstractAIBehaviour currentBehaviour;

    // Triggers that must exist in the A.I. Animator.
    public static readonly int BEHAVIOUR_ENDED = Animator.StringToHash("behaviour_ended");
    public static readonly int BEHAVIOUR_ERROR = Animator.StringToHash("behaviour_error");

    /**
     * Forces a behaviour, interrupting the one being currently executed.
     */
    public void SetBehaviour(int behaviorHash)
    {
        // Safely disable the current behaviour.
        if (currentBehaviour)
            currentBehaviour.enabled = false;

        try
        {
            // Start the new behaviour.
            currentBehaviour = behaviours[behaviorHash];
            currentBehaviour.enabled = true;
        }
        catch (KeyNotFoundException)
        {
            currentBehaviour = null;
        }
    }

    void Awake()
    {
        stateMachine = GetComponent<Animator>();

        // For each child.
        foreach (AbstractAIBehaviour behaviour in GetComponentsInChildren<AbstractAIBehaviour>())
        {
            // Register it.
            behaviours.Add(behaviour.GetBehaviourHash(), behaviour);

            // Listen to it.
            behaviour.OnBehaviourEnded += OnBehaviourEnded;
            behaviour.OnBehaviourError += OnBehaviourError;
        }
    }

    /**
     * Notify the A.I. Animator when a behaviour ends.
     */
    private void OnBehaviourEnded()
    {
        stateMachine.SetTrigger(BEHAVIOUR_ENDED);
    }

    /**
     * Notify the A.I. Animator when a behaviour fails.
     */
    private void OnBehaviourError()
    {
        stateMachine.SetTrigger(BEHAVIOUR_ERROR);
    }
}
This class is a tad more longer, but the code is really simple:
- A dictionary contains our known behaviours;
- A method makes it possible to activate one specific behaviour;
- Two events are used to notify the Animator when a behaviour ends.
Now that we have our entry point, we can connect our Animator with it. How do we do that? Well, with a feature that you may or may not know, as it’s not widely used: with StateMachineBehaviour.
https://docs.unity3d.com/ScriptReference/StateMachineBehaviour.html
What does this do? Well, it allows us to plug custom code into the Animator. And guess what we are going to do with that?
We are simply going to call our AIBehaviourController when the Animator state changes.
/**
 * This class is meant to be plugged in the A.I. Animator.
 *
 * It's only role is to monitor the state transitions inside the Animator.
 */
public class AIStateController : StateMachineBehaviour {

    /**
     * Notify the A.I controller when the animator enters a new state.
     */
    override public void OnStateEnter(Animator animator, AnimatorStateInfo info, int layerIndex)
    {
        if (!animator.GetComponent<AIBehaviourController>().SetBehaviour(animatorStateInfo.shortNameHash))
        {
            // If the state doesn't exist, then it's a decision hub.
            // Force the Animator into evaluating it right away.
            animator.Update(0f);
        }
    }
}
This code is extremely straight forward, except that it deals with one oddity from Unity: an Animator cannot process more than one state per frame, causing a small delay when you have to traverse a decision hub.
Fortunately, the solution is as simple as forcing the Animator to go through it anyway by forcing an Update.
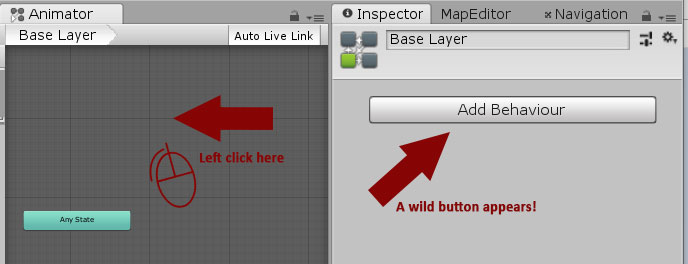
With our new class, we can finally glue things together, simply by adding it to our A.I. Animator.
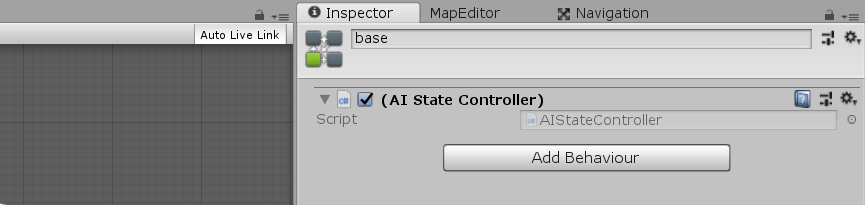
In the end, we have three classes part of the framework, and subclasses plus a character controller to include the actual game logic.
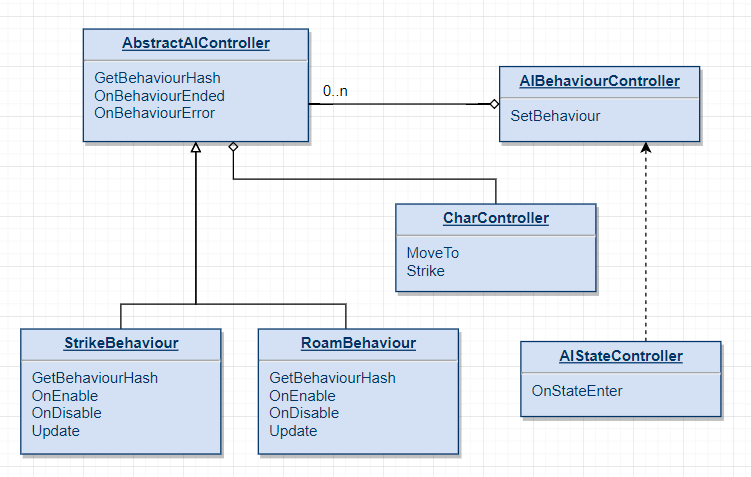
A small class diagram to synthetize our A.I. framework.
Including your game logic
All-in-all, the technical solution sums up to three classes, each one very concise.
What more do we need? Well, the game itself indeed! But unfortunately, this part has to be your own.
So, what more do you need to get your own A.I.?
- A character controller, responsible for the actual logic of the character and its rendering;
- Your variables and the code keeping them up-to-date for your A.I. Animator;
- Your own behaviours such as “Strike”, “Move”.
But at this point, it’s standard Unity code as you are used to.
Last words
If you liked this article, follow us on twitter (https://twitter.com/synnaxium) to be notified when a new article is available!
Any question? Any comment?
Don’t hesitate, we are available and will answer you gladly 🙂
Thanks a lot for the tut’ !
Very helpful !